Node.js, Server-side rendering & cookies
Introduction
You are very familiar with Javascript by now, and you may notice that we can
only run Javascript in our browser using the <script> tag. What if we want to
write scripts using Javascript and run them using the local machines, just like
how python is.
This is where Node comes into play. It is a JavaScript runtime engine built on Chrome's V8 Javascript engine that allows you to run JavaScript even without a browser. This means that you are able to do a lot more with JavaScript: managing local files, connecting and setting up a server, and much more.
Learning Objectives
- How npm & node works
- Create Backend APIs using Node & Express
- How to make API calls using axios
- File system with node & express
- Understand cookies
Getting Started
Let's start by creating a folder for us to put our code in. Let's call this
folder example and then let's cd` into it using the console.
mkdir example
cd example
NPM
With the ability to run JavaScript locally on our machine (with the help of Node) and the contribution of a rich number of packages from a large community, the possibilities for JavaScript are endless!
To manage many of the packages that give Node its most powerful abilities, we use NPM. Node package manager (NPM) is a place where you can find and download node packages.
Installing Node
Go to https://nodejs.org/en/ to install node.js for free.
Let us confirm that you have correctly downloaded Node.js and npm.
In the terminal, type
node -v
npm -v
If both lines output the version number then we are good.
Now, let us install out first package. The remainder of this example we will be using Axios to make HTTP requests as necessary, so let us install Axios.
Navigate to the folder where we are storing our project, in this case example/
while there, type the following command:
npm init -y
npm install axios
The npm init command is used to create a new npm package, essentially every
node script that we will write can be treated as a npm package. The -y flag
just skip all the configuration step and creates a most basic npm package with
all default settings.
Now when we list the files in our example/ directory, we should see three
things:
node_modulesfolderpackage.jsonfilepackage-lock.jsonfile (optional)
Essentially, each of these helps npm organize the packages we installed. In the node_modules folder is where we can find our actual packages. Many times, our node_modules file grows incredibly large and can take up quite a bit of space. It is discouraged to go directly into the node_modules, instead, npm provides a variety of utilities which we can use to keep our projects clean and efficient. I won't go into them here, but as you develop, you will run across them or you can read the docs here. The other file is the package.json file. The package.json file is the file which record and defines the top-level packages and dependencies for our project. package-lock.json is a similar idea but with some nuances, you do not need to worry about those.
Hello World
Now let's move back to Node for a second. Let's create a file called
helloworld.js in the example/ folder. Enter console.log("hello world.") in
the file.
You can run any node file by using the Node command.
node helloworld.js
The console should print "hello world." and then exit.
JS in Browser vs. Node.js
Node in browser and Node.js are technically the same form of JavaScript. Both
run on the browser's JavaScript engine, usually Chrome V8. However, there are
some fundamental difference which make Node.js just different enough to be
annoying. The most prominent difference is that Node.js uses the require
module to import other modules which define functionality. All Node projects are
organized into modules, and we use require to import them. For example, the
following code imports Axios, a package commonly used to make HTTP requests.
Another difference is that since there is no web page to be manipulated, there
is no document object for Node.js, which means that DOM manipulation cannot be
carried out in Node.js (with the help of some packages, it can).
Since Node is a server side language, it can interact with the local file system easily, it also provides ways to setup a server with ease.
If you are familiar with the fetch function in JS, there is no fetch function
in Node. You can use the http package or some other third party package to
handle sending a request.
SSR - Server Side Rendering
So far we have just been double-clicking on our index.html file and letting our browser read the file from disk. This isn't how real websites work! This is just a handy feature browsers have. Just like they can read PDFs, they can read HTML files. But don't be confused, what you're seeing is not a website. For example, browsers will not respect cookies that you set from an HTML file that you are just viewing (they will not be persisted).
So how to websites really work? Basically, a compute has a special application running (called a server) which is constantly listening to incomming requests via the internet. When requests come in, it sends back the HTML file.
Alright, but what's the internet?
The internet
The internet is simple. There are a bunch of computers, each with an IP, that send each other information. They refer to each other by IP address.
Here is a diagram of five computers connected to the internet. Each has it's own IP address that uniquely identifies it. You are on the left, playing Minecraft while writing your History essay. Those are the processes running on your machine. On the right is Vikhyath (Vik for short) on another computer. They are also playing Minecraft but you've never met them.

Vik would like to make a website, so he creates a bunch of HTML files and stores them somewhere on his computer. He can open the index.html as always
and view it in his browser.
However, only he can see them! So he spins up a new process (a.k.a program). Processes that make websites public to the world are known as servers. Vik starts up a server, telling it where the HTML files are in his computer.
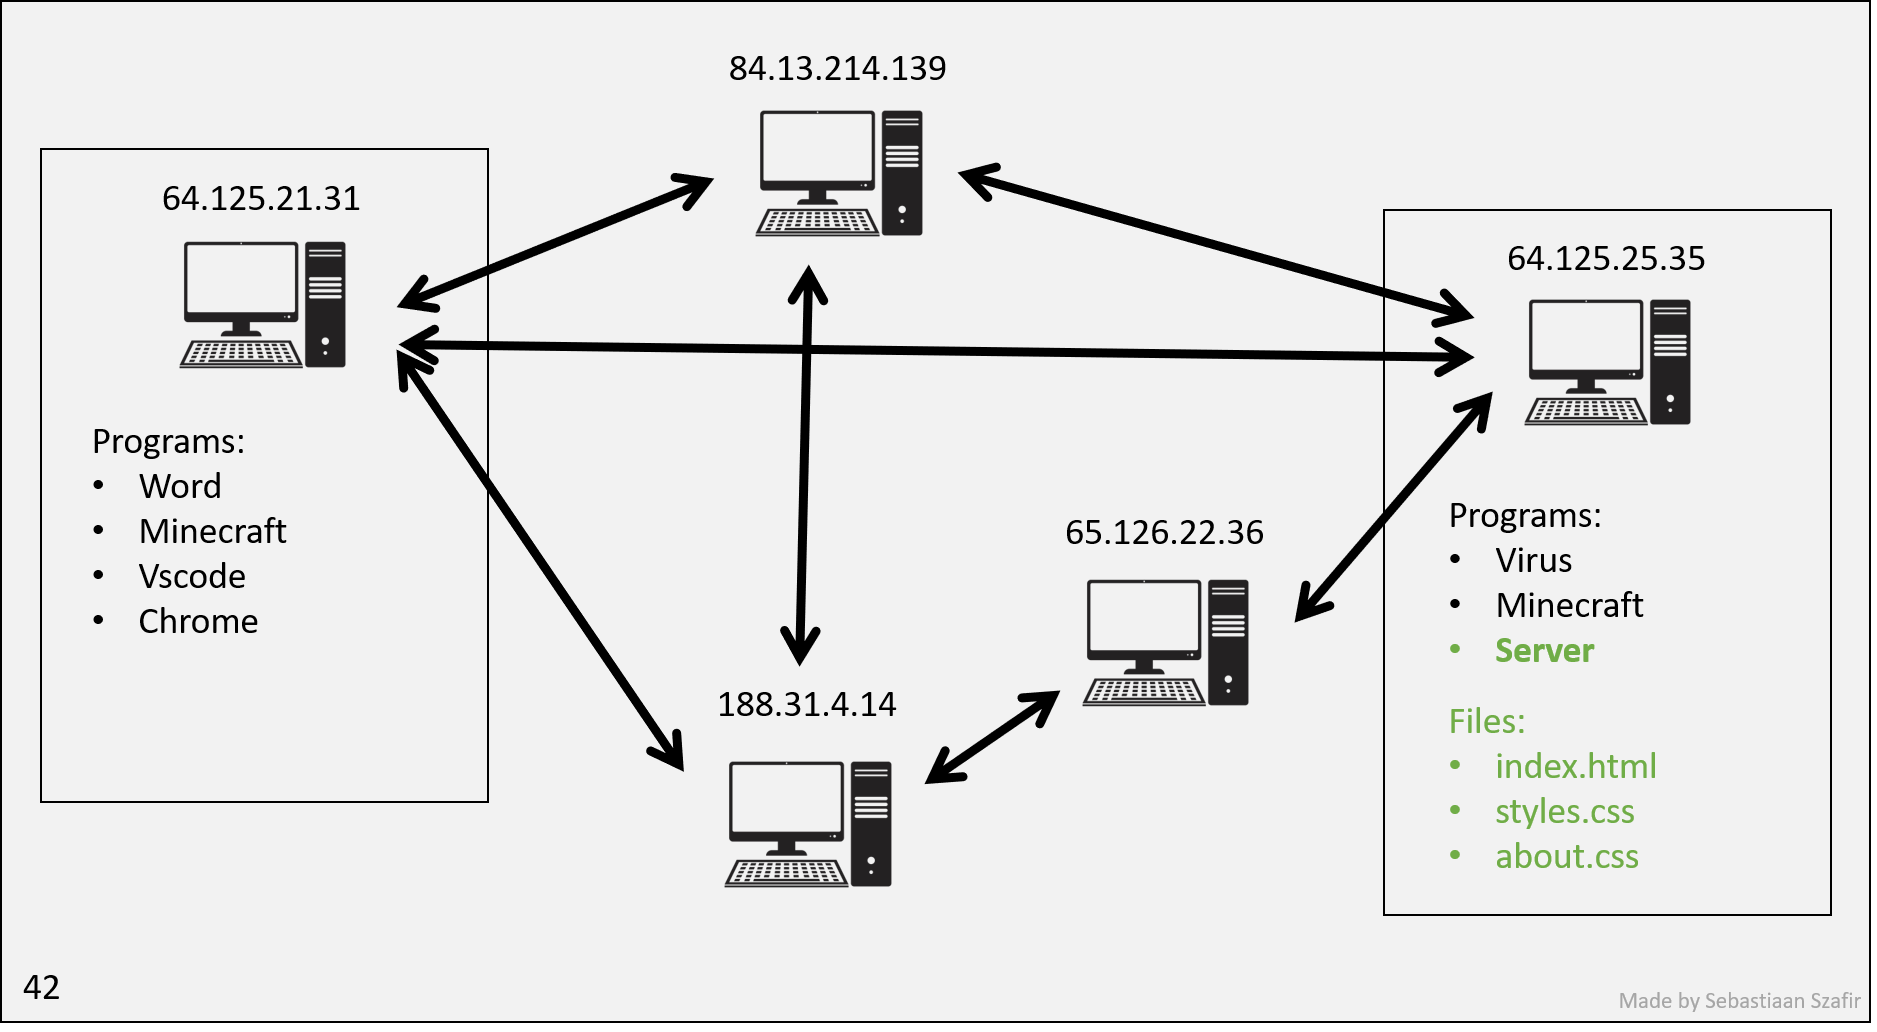
To visit Vik's website, you need to send a request to Vik's server. So you send an internet request to Vik's IP address. However, upon arrival, his computer is scared it may have a virus, so it's designed not to tell all it's processes about all incoming requests. So it ignores your request.
Aw shucks! You have to be more specific, you have to tell Vik's computer you'd like to talk to the server. Luckily, operating systems let processes reserve ports. Then, when they get requests, the requests can specify what port they're looking for and whichever process has reserved that port will be able to see the request.
You ask Vik for help, and he tells you the server is listening on port 80.
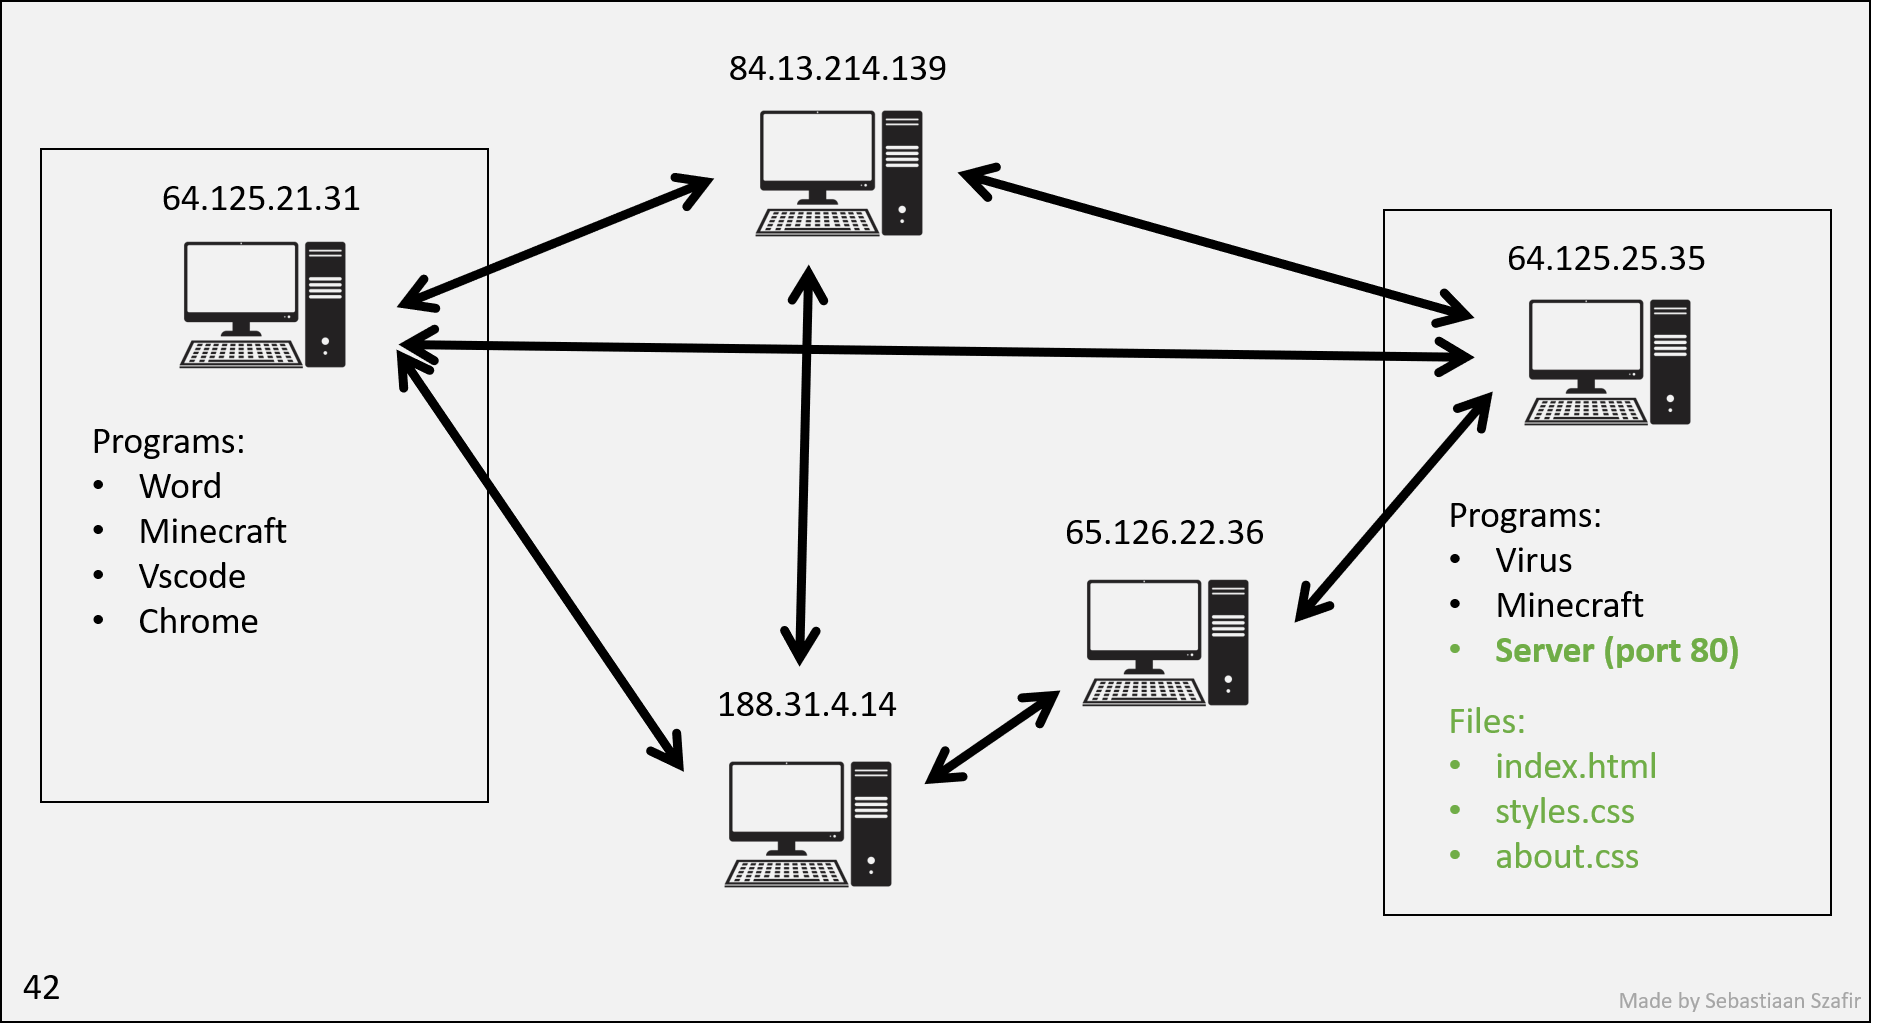
So you go to your Chrome process and type 64.125.25.35:80 into the URL bar. When you hit enter, your computer sends an internet request to Vik's computer, specifying that it wants to talk to the process on port 80. The server receives this along with the port that you're listening to so that it can send the HTML page right to you!
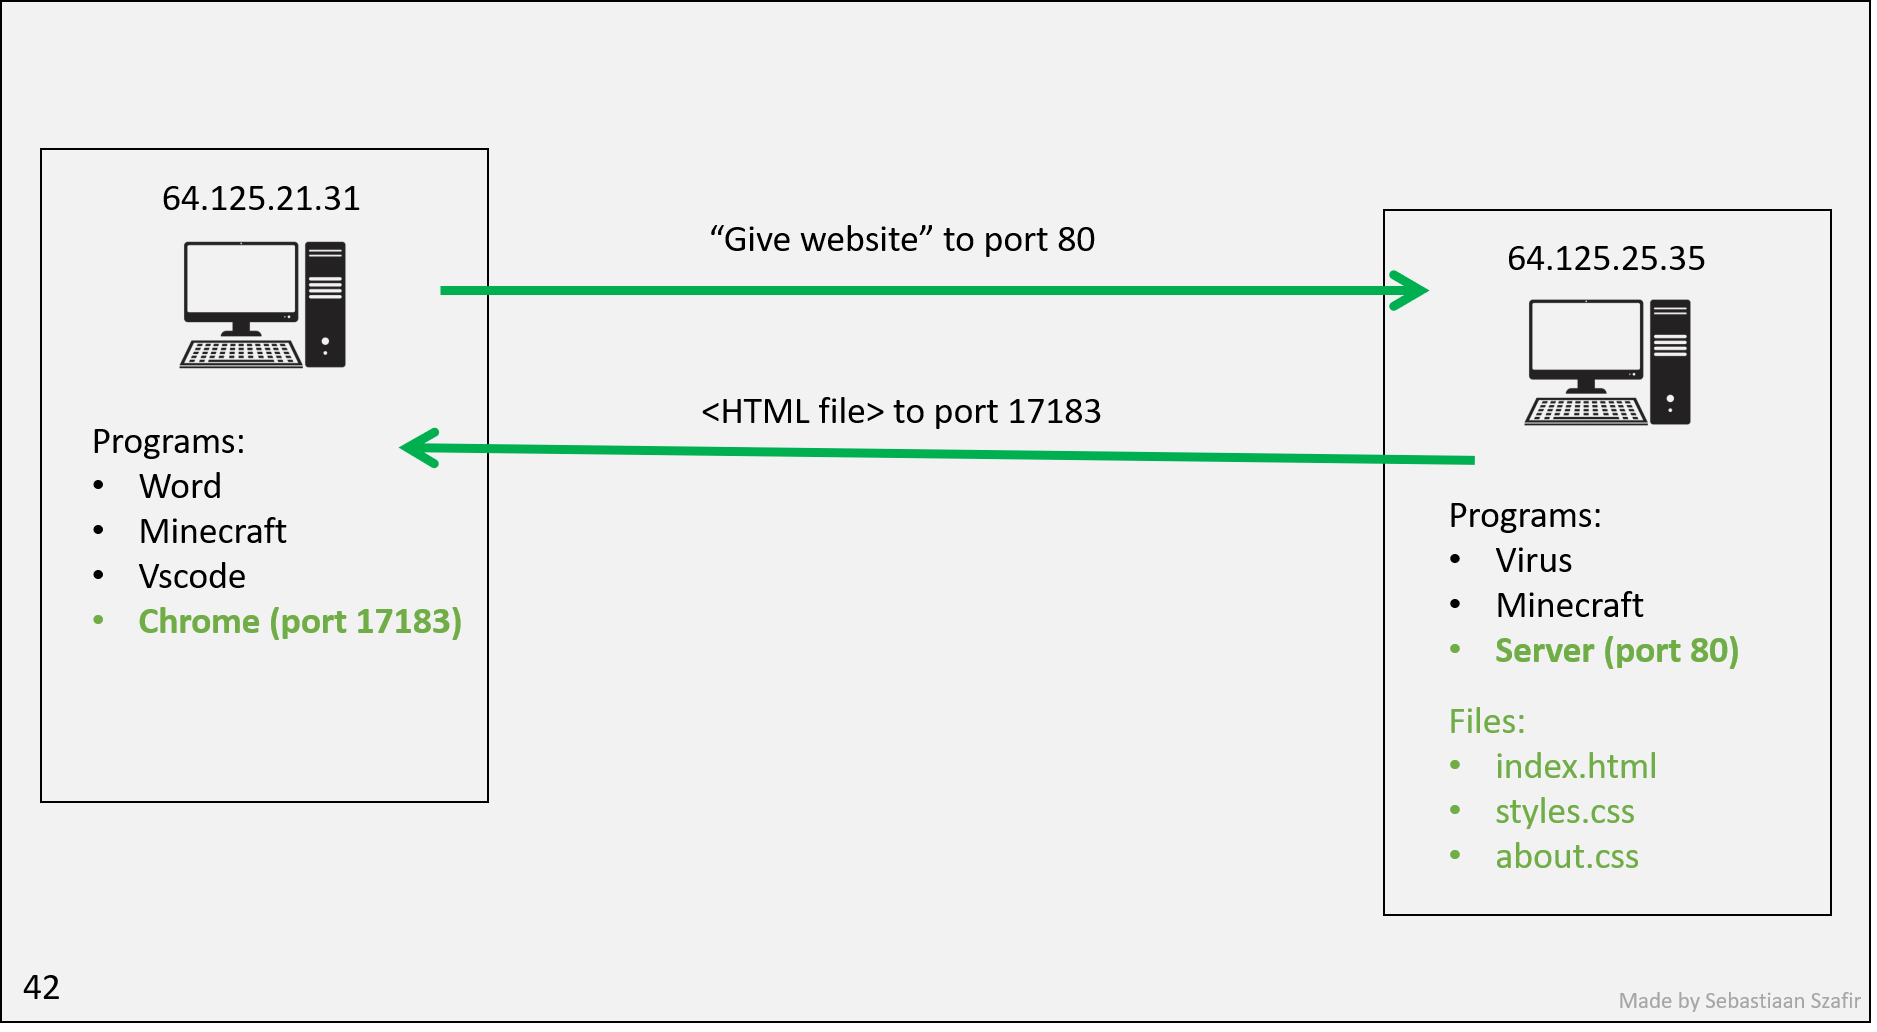
Chrome reserves some random temporary port in an instant right as you press enter so that it can receive a response. The processes can now communicate securely without other processes on the respective machines ever finding out.
Configuring your network
Sadly we ran out of IP addresses a while ago so we don't have enough for every device. Instead, your house has a router which has an IP address. Then each computer that conencts to it gets a fake IP address, which the router convinces your computer is real so that your computer never even has to deal with the fact that it's fake. When it sends or receives requests, the router deals with switching out the IP addresses every time.
However, since your IP address is fake, others can't send you stuff! Only you can send other people stuff. So if you start up a server right now, your friends will not be able to see it unless you configure your router appropriately.
Furthermore, it's possible your computer itself has a firewall, which is a program that blocks incoming requests. You can configure your firewall to allow incoming requests to certain ports.
Luckily, you don't have to do any of this. Nowadays it is far more common to use a cloud service to rent out someone else's computer, and they will figure this all out for you and give you an IP address you can use.
Domains
Alright now Vik has a website, but it's not very easy to remember his IP address. So he buys a domain name, which is just a string of characters that maps to an IP address. He buys vikhyath.com and sets it to map to his IP address.
Now Chrome has even more work to do... Every time you type in a domain name, it has to go to the DNS server (yes, another server, with an IP that ALL browsers come pre-loaded with), which will tell it the IP address of the domain name. Then it can send the request to the IP address.
For redundancy there are many DNS servers, and they all have the same information. So if one is down, Chrome can just go to another one. Chrome has a list of all the DNS servers, and it will try them in order until it gets a response.
If they all went down, we'd have to go back to memorizing IP addresses :(. Essentially, Chrome memorizes just a few IP addresses of DNS servers so that you don't have to memorize any.
Default port
So, when you type google.com, it finds that the IP is 51.68.47.158. But what port?
Browsers default to port 80, so it will send the request to 51.68.47.158:80.
Try it out! Go to google.com:80. You'll see your browser sneakily gets rid of the port. But if you try any other port, it won't work!
Web Server with Node & Express
Let's make a server! (It's called a server because it serves files to people who request them).
Install Express
Let's build a web server using Node! Since building a server can be very hard using Node, a package called Express is often used to set up a web server in a faster and simpler way.
Let's install it by npm install express.
After installing express, you would find it under the dependencies attribute in
the package.json file.
Basic Web Server
const express = require('express');
const port = 3000;

const app = express();

app.get('/', (req, res) => {
  res.send('Hello World');
});

app.listen(port, () => {
  console.log(`Example app listening at http://localhost:${port}`);
});
We tell express what port to listen to. Now, if a request comes to your IP address at port 3000, this Javascript process will be able to see it.
Luckily, instead of finding and memorizing your IP, you can use the shorthand localhost. This is a special domain name that always refers to your own computer.
So you can go to localhost:3000 to see your website. It should say Hello world.
Lets look at this part more closely:
app.get('/', (req, res) => {
  res.send('Hello World');
});
When you type out your website, you could have typed localhost:3000/about, and you'd expect a different page!
Luckily, we don't have to make any if statements to pick what site to send. Express will do that for us. We just have to tell it what to do for each site.
Let's analyze the rest line by line.
To import any npm packages that we download, we use the require() function
provided by Node. Thus, the const express = require('express')
const app = express() creates an app object that provides various useful
methods.
app.get('/', (req, res) => {
  res.send('Hello World!');
});
The get method will return "Hello world!" once a web browser visits
http://localhost:3000 Essentially, we are telling node
that when the user makes a GET request to the / url (this is the root url),
define this response and send it.
app.listen(port, () => {
  console.log(`Example app listening at http://localhost:${port}`);
});
The listen method will set up and start the server that listens for any
requests at a specific port.
Let's start our application by typing node main.js then visiting
http://localhost:3000
You would see a Hello World displayed on the screen, which means that our server is up and running.
Sending HTML
Let's send some HTML instead of just text.
app.get('/', (req, res) => {
  res.send('<h1>Hello World</h1>');
});
You have to stop and restart your server to see the changes.
So if you were to paste your entire HTML file in there, it would work! But that's not very efficient. Let's make a separate file for our HTML.
app.get('/', (req, res) => {
  res.sendFile(__dirname + '/index.html');
});
__dirname is a special variable that refers to the directory of the current file. So this will send the file index.html in the same directory as main.js.
What if your HTML file makes reference to other files, like CSS or JS files? You have to send those too!
app.get('/styles.css', (req, res) => {
  res.sendFile(__dirname + '/styles.css');
});
Now you can go to localhost:3000/styles.css and see your CSS file. Or even better, you can add a <link> tag in your HTML file to link to the CSS file.
Your browser will then make another request to your server for the CSS file! If you wanted to have fun, you could return a random CSS file every time, and your website would look different every time you refresh!
SSR (Server Side Rendering)
So what is the point of all this? Why not just make a static HTML file and send it to everyone?
We want to be able to send different HTML files to different people. For example, if you go to youtube.com, you'll see a different page than if I go to youtube.com.
Web server with state
Now let's define some more functionality for our server.
We will be implementing a view-count tracker. Every time a user visits our site, we will log their visit, and inform them on how many people have visited the site.
In principle, this is simple:
- Create a variable to store the number of visits
- Increment the variable every time someone visits
- Send the variable to the user
const express = require('express');
const port = 3000;

const app = express();

let totalViews = 0;

app.get('/', (req, res) => {
  totalViews++;
  res.send("<h1>Welcome to my website!</h1> Total views: " + totalViews);
});

app.listen(port, () => {
  console.log(`Example app listening at http://localhost:${port}`);
});
Now, if we restart the server, we'll notice it tells us the total views is 1. Every time we reload the site, it increments!
Even if we close out the tab, or even visit it from another browser, it will remember the total and increment it.
And if it wasn't for the many reasons outlined above, we could even have our friends visit the site and it would still work, with one global number for the number of views!
Templating
However, what if we still want our HTML to be in a separate file? We can't just send the HTML file, because we need to insert the number of views into the HTML file.
Welcome to templating!
In principle, this is very simple. Just make an index.html file with a placeholder for the number of views, and then replace the placeholder with the number of views.
index.html
<h1>Welcome to my website!</h1> Total views: {{views}}
main.js
const express = require('express');
const fs = require('fs');
const port = 3000;

const app = express();

let totalViews = 0;

app.get('/', (req, res) => {
  totalViews++;
  let html = fs.readFileSync(__dirname + '/index.html', 'utf8');
  html = html.replace('{{views}}', totalViews);
  res.send(html);
});

app.listen(port, () => {
  console.log(`Example app listening at http://localhost:${port}`);
});
Notice we're now using the fs package, which is a built-in package for reading and writing files.
We read the file, replace the placeholder, and send it. Very simple.
Persisting data
However, you may have noticed that when we restart the server, the number of views resets to 1. This is because every time we restart the server, the variable resets to 0.
For now, we'll store it in a file. Later, we'll learn how to store it in a database (databases have higher reliability, speed and are better organized than raw files).
const express = require('express');
const fs = require('fs');
const port = 3000;

const app = express();

let totalViews = 0;

if (fs.existsSync('views.txt')) {
  totalViews = parseInt(fs.readFileSync('views.txt', 'utf8'));
}

app.get('/', (req, res) => {
  totalViews++;

  fs.writeFileSync('views.txt', totalViews);

  let html = fs.readFileSync(__dirname + '/index.html', 'utf8');
  html = html.replace('{{views}}', totalViews);

  res.send(html);
});

app.listen(port, () => {
  console.log(`Example app listening at http://localhost:${port}`);
});
Now you can restart the server all the times you want, and it will remember the total views! Sweet.
You may think all these weird fs functions we're using are complicated and that we haven't
taught them. What's __dirname or utf8? Truth is, noone knows these by heart.
Tools like Google and ChatGPT will spit them out, and as long as you understand what they're there for, you're all set.
An alternative tale: Cookies
During Lesson 5 - Javascript 2, we promised to come back to the topic of cookies when we understand servers. Well, here we are.
As a refresher, cookies are a way of storing information in the browser that survives page refreshes (different than above, where the data that survived refreshes was stored in theserver).
Even though we introduced cookies as being set and read by Javascript that you write and send to the client (the client is the browser that receives the files sent by the server),
cookies were initially envisioned to be set and read by the server!
For this reason, every time you visit a site, all cookies stored by that site are sent as part of the request to the server. You may have been
asking yourself what the req variable is in the line app.get('/', (req, res) => {. Well, alongside information like the
client's IP, you get the cookies! That's right, all the cookies.
The server can then read the cookies, and send back a response with new and updated cookies. The client will then store these cookies and send them back next time.
So why not just store the number of views in a cookie instead? That way we won't even need to persist the number to a file!
const express = require('express');
const fs = require('fs');
const port = 3000;

const app = express();

function getCookie(cookieString, name) {
  let cookie = cookieString.split(';').find(cookie => cookie.trim().startsWith('views='));
  if (cookie) {
    return cookie.split('=')[1];
  }
  return 0;
}

app.get('/', (req, res) => {

  let totalViews = getCookie(req.headers.cookie, 'views');

  totalViews++;

  let html = fs.readFileSync(__dirname + '/index.html', 'utf8');
  html = html.replace('{{views}}', totalViews);

  res.setHeader('Set-Cookie', `views=${totalViews}`);

  res.send(html);
});

app.listen(port, () => {
  console.log(`Example app listening at http://localhost:${port}`);
});
As you can see, stored in req.headers.cookie are all the cookies the client sends us. But what's a header? Well, websites communicate with the client using something called the HTTP protocol. And in this protocol, the world header signifies extra bits of information that tag along with the rest of the message.
In this case, we're interested in the bit of information called cookie, hence req.headers.cookie.
You may notice that, just like in the client-side, we need to create a complicated function to extract the cookie from a long string. The string with all the cookies comes in the form cookie1=value1; cookie2=value2; cookie3=value3. We need to split it by ;, then find the cookie we want, then split it by = to get the value.
Just like the client sends us the cookies as a header, we send the client the new cookies we intend to have it remember as a header too. Note that setHeader doesn't send the header, it just sets it in the response message. It is res.send that does all the sending, including the header we set.
So why not just use cookies instead of a file / database?
Well, there are several fundamental differences you may have caught:
- These views are no longer global. If you visit the site from another browser, you'll see a different number of views. Each browser stores it's own cookies!
- Apart from at the exact times the client makes a request, the server (you) can't figure out how many views people have! The data is in people's browsers, not a file / database you control!
- This also means they are not secure. People can just change the number of views and send you whatever they want! This is acceptable in some scenarios, but not in others.
In this case, cookies are not a reasonable solution. We will encounter good uses of cookies later in the course, such as logging in.
Templating engines
This subpart of the course (templating engines) is strictly optional, but will be very helpful with your projects.
You may have noticed that templating is a bit annoying. We have to read the file, replace the placeholder, and send it. Very simple, but it's a lot of code. And what if we want to replace multiple placeholders? We'd have to do it multiple times.
Luckily, there are templating engines that do all this for us. They're a bit more complicated, but they're worth it.
We'll be using the templating engine called ejs. You can install it with npm install ejs in your terminal (you must be in the folder with your project in it!).
Now, instead of sending the HTML file, we'll send the HTML file through the templating engine.
const express = require('express');
const fs = require('fs');
const ejs = require('ejs');
const port = 3000;

const app = express();

let totalViews = 0;

app.get('/', (req, res) => {
  totalViews++;

  let html = fs.readFileSync(__dirname + '/index.html', 'utf8');
  html = ejs.render(html, {views: totalViews});

  res.send(html);
});

app.listen(port, () => {
  console.log(`Example app listening at http://localhost:${port}`);
});
With new HTML:
<h1>Welcome to my website!</h1> Total views: <%= views %>
Now, instead of replacing {{views}}, we use <%= views %>. This is called an ejs tag. It tells the templating engine to replace it with the value of views.
We also have to tell the templating engine what to replace it with. We do this by passing in an object as the second argument to ejs.render. The keys of the object are the names of the variables we want to replace, and the values are the values we want to replace them with.
Now, if we want to replace multiple things, we can just add more tags and more keys to the object.
<h1>Welcome to my website!</h1> Total views: <%= views %>
<h2>My name is <%= name %></h2>
html = ejs.render(html, {views: totalViews, name: 'Sebastiaan'});
Javascript - An important disambiguation
This lesson, we've taught you how to create a web server using Javascript with Express. However, we've been using Javascript in a very different way than we have before. We've been using it as a server-side language, not a client-side language.
This JavaScript is not running in the browser / client! It's running on your computer (server-side), and it's not sending the code to the browser. It's sending the result of the code to the browser.
We could, as part of that result, send JavaScript to the browser in a <script> tag, which would then execute in the browser. You will be expected to understand this difference intimately while creating your projects.
Server-side JavaScript has access to things like your filesystem, and can create the HTML response as it pleases, including the client-side JavaScript itself! Client-side JavaScript run afterwards in the browser, and has access to manipulating the HTML only after it has loaded.
Resources
Get Query Strings and Parameters in Express.js
Contributors