HTML
Introduction
A basic website is just a set of .html, .css and .js files stored somewhere. The .html file is the primary document, specifying the content of the site,
with .css and .js files adding extra visuals and functionality. In this lesson, you'll learn the HTML language, which is
what .html files are written with. Be prepared for your website to look like it's from the 90s!
HTML isn't actually a programming language since it's not composed of computer instructions like "if" or "while". It's like how English isn't a programming language either: you can't "run" English. Same idea with HTML: you can't "run" HTML. Instead, you can "view" an HTML file, you like you "view" an essay. HTML is simply the language and pictures on the page. It's the static (which is another word for unchanging) content.
Learning Objectives
- Understand what is HTML
- What are tags and how to use different HTML tags
- What is metadata
- How to write comments
Basics of HTML
Elements and tags
Here's an example .html file:
Welcome to my website!
That's right, plain text is valid HTML! But that's not very useful. If you viewed this file on a browser, you'd just see the words "Welcome to my website!" in tiny font on the top left. HTML stands for Hypertext Markup Language. Essentially it lets you do cooler things than just plain text.
For example, you can make text bold or italicized.
<b>This text is bold!</b> <i>This text is italicized!</i>
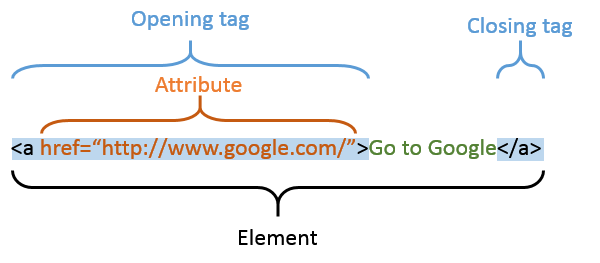
HTML's base building block is the element. Above you can see the <b> and <i> elements. An element is a building block, acting
on what's inside it. Every element has an opening and a closing tag. For example, <b> is the opening tag for the bold element, and </b> is the closing tag.
Everything in between the opening and closing tag is affected by the element. In this case, the text is bolded.
If you opened this .html file, you would see this:
This text is bold! > This text is italicized!
Self-closing tags
See how both the bold and italicized text are on the same line? If you want to put them on separate lines, you can use the <br> element, which stands for break rule.
<b>This text is bold!</b><br />
<i>This text is italicized!</i>
Note that the choice to put multiple elements on the same line or to seperate them out is entirely irrelevant. You could write your HTML file all in one line if you wanted to.
Now, if you opened this .html file, you would see this:
This text is bold!
This text is italicized!
Note that the break rule element is a "self-closing tag" or "void tag" that open and close themselves. This is because it doesn't have allow any content.
Since it's obvious all <br> tags are self-closing, you can omit the closing tag and just write <br> instead of <br/>.
You don't need to close this tag with </br> since it's self-closing'.
Attributes
Some elements have extra things you can configure about them. For example:
<a href="https://webatberkeley.org">This is a link!</a>
The <a> makes whatever is inside of it into a link! But to where? It needs extra information!
Here, we give the <a> element the href attribute, and set the value of the attribute to the URL of the desired destination.
Now, if you opened this .html file, you would see this:
So, putting it all together, HTML is composed of elements, which have opening and closing tags (or self-closing tags), and optionally can take attributes:
Nesting
You can also put elements inside of other elements. For example:
<b>This text is bold and <i>italicized!</i></b>
Now, if you opened this .html file, you would see this:
This text is bold and italicized!
File Layout
All HTML files must have the following elements:
<!DOCTYPE html>⇒ Declares the document as being of type html<html>⇒ anything within this tag is to be interpreted as html<head>⇒ holds the metadata for the document<body>⇒ contains all the actual html that will be displayed on the site
For example:
<!DOCTYPE html>
<html>
  <head>
    <!-- *Metadata goes in here -->
  </head>

  <body>
    <!-- *Actual Content Goes in Here -->*
    <b>Hello World!</b>
  </body>
</html>
This will look exactly the same as just <b>Hello World!<b> when you open it because the browser realizes you forgot to add the four required elements and adds them for you.
However, it is good practice to add them yourself.
The green text are comments. They start with <!-- and end with -->. Comments are ignored by the browser, so you can write whatever you want in them.
Metadata
Everything we've learned so far would go in the <body> element. However, there's some data that you may want to specify about the website that isn't necessarily
visible in the page. These options go in the <head>. For example, you can specify the title of the page:
<!DOCTYPE html>
<html>
  <head>
    <title>My Website</title>
  </head>

  <body>
    <b>Hello World!</b>
  </body>
</html>
Now, if you opened this .html file, the tab that the page is on would say My Website.
What does Google.com look like?
You can Inspect Element on any webpage to see the HTML code that is actually being run.
Right click anywhere (even right here!), and choose Inspect Element. You can even edit it!
This is super useful for understanding why a website you may be making looks the way it does.
Common HTML Tags
Alright, so let's learn all the tags, right? No. Depending on who you ask, there's up to 142 tags, some of which have been deprecated (phased out) since before the turn of the century.
Not even the most experienced web developers know all the tags. Instead, whenever you need to do something, you can just google it.
To get some familiarity for what's out there, we'll cover the most common tags.
<p> tag → Just regular text
<p>Text!</p>
Sounds useless? It's not! It adds a line-break (equivalent to <br>) before and after the text.
So why not just use <br>? Because it's bad practice to use <br> to separate paragraphs. <p> is the correct way to do it.
A lot of HTML comes down to good and bad practice. You can do a lot of things in a lot of ways, but some ways are better than others.
<h1> - <h6> tags → Headers
<div>
  <h1>I'm a big header!</h1>
  <h3>I'm a slightly smaller header.</h3>
  <h5>I'm a small header.</h5>
</div>
<h1> makes the text super big. <h2> makes it a little smaller. <h3> makes it a little smaller than that. <h4> makes it a little smaller than that. <h5> makes it a little smaller than that. <h6> makes it a little smaller than that.
Furthermore, header types are used for SEO (Search Engine Optimization). Google uses header tags to divide up a website.
<h1> tags are seen as main subjects for a website, while <h3> tags are seen as subsections.
<h1>-<h6> tags also add a line-break before and after the text. How do you know which elements add a line break (e.g. <p>) and which don't (e.g. <i>)?
You don't! You either know or you don't. Because of this and so many more reasons, you'll be googling (or binging) a lot.
<a> tag → Link
<a href="https://webatberkeley.org">This is a link!</a>
We covered these above, but basically they are just links. They've got a couple more attributes you can configure, you should google them!
<button> tag → Buttons
- Creates a clickable button
- Put elements inside and around the button to make it functional and pretty
<a href="https://webatberkeley.org/">
  <button>
    <p>Go to Web Dev at Berkeley's site</p>
  </button>
</a>
This would look like
Awesome? Yes.
<span> tag (optional) → Spans
- A container for small pieces of text
- Will be more useful when we learn about CSS
<img> tag → Image
Displays images
srcattribute points to the imagealtattribute is displayed as text if the photo is unavailable or cannot be used<img />is a self closing tag- This makes sense because an image tag doesn't contain anything - it simply displays an image
widthandheightset the dimensions of the image
<img
  src="../../static/img/logo.png"
  alt="my picture"
  width="200"
  height="200"
  class="my-picture"
/>
Inputs → <input> tag
- Inputs can have different types, such as text (default), password, email, file, and many more that all come with their own unique validation and behavior
<div>
  <input />
  <input type="color" />
  <input type="file" />
  <input type="number" />
  <input type="datetime-local" />
  <input type="radio" />
  <input type="checkbox" />
</div>
<select>, <option> tags → Selects and Option
<div>
  <select id="farm-animals">
    <option class="animal" value="pig">Pig</option>
    <option class="animal" value="cow">Cow</option>
    <option class="animal" value="rooster">Rooster</option>
  </select>
</div>
Allows the user to pick one of the options.
<div> tag → Divs
- Short for division
- Generic container tag
- They don't do anything on their own, but they are used to group elements together
For example, somewhere on your page you may have some sign-up page:
<div id="signupPage">
  <h1>Sign up for our newsletter!</h1>
  <p>Enter your email below to receive updates on our latest products.</p>
  <input type="email" placeholder="Email" />
  <button>Sign up</button>
</div>
Notice we gave the <div> an id attribute. This is so we can reference it later. In this case, we set it to signupPage.
Now imagine the sign-up page is very far down, and you'd like to make a button to take the user down to it. Easy!
Since we wrapped the sign-up page in a <div id="signupPage">, we can just do this:
<a href="#signupPage">
  <button>Sign up for our newsletter!</button>
</a>
Here, the href attribute of the <a> tag is set to #signupPage. This is called a hash. It's a special type of link that takes you to a specific part of the page.
Note that you can give any element an id attribute, not just <div>s. You shouldn't give more than one element the same id though. For example, we could
have achieved the same effect by ommiting the div entirely:
<div>
  <h1 id="signupPage">Sign up for our newsletter!</h1>
  <p>Enter your email below to receive updates on our latest products.</p>
  <input type="email" placeholder="Email" />
  <button>Sign up</button>
</div>
But this is formatted worse, because the <h1> tag is just the beginning of the sign-up page. If you ever remove it or change it for something else, you could
accidentally break the link. You can think of <div>s as a way to organize your website.
<form> tag → Form
- A group of html tags related to gathering data from a user
- This will be some combination of
input,textarea, andselecttags - A form is just a container for the other tags
<form>
  <input type="text" />
  <textarea></textarea>
</form>
Sounds like just another <div> tag, right? Well, there's a key difference. Forms can contain information about where the data should go once the user submits.
We'll learn this later in the course.
More tags
These are tags you can just search up if you need them. They aren't required to build your intuition.
<ul>, <ol>, <li> tags → Lists
<ul>stands for unordered list (bullet points ⇒ Where order doesn't matter)<ol>stands for ordered list (1. 2. 3. ⇒ Where order matters)<li>stands for list item
<ul>
  <li>This is an</li>
  <li>unordered list</li>
  <li>with 3 items</li>
</ul>
This would look like
- This is an
- unordered list
- with 3 items
<textarea> tag → Textarea
- A larger input for text
- The
placeholderattribute specifies what shows up in the textarea when the user hasn't entered any input (Optional) - The
rowsattribute specifies how many rows of text the textarea offers initially - this can be increased if the user inputs more text than the number of rows given to the textarea (Optional) - Despite nothing going inside the textarea tags, it is not a self-closing tag (HTML is a really old language and so we have to live with some old quirks)
<textarea
  id="textarea-id"
  placeholder="this is temporary text"
  rows="4"
></textarea>
You can think of this as a very large <input/> tag (with no type attribute set).
<table>,<tr>, <td> tags → Table
tablecreates a tabletrstands for table rowtdstands for table data, basically represents a cell in your table
<table id="coordinates">
  <tr class="top-row">
    <td>(0,0)</td>
    <td>(1,0)</td>
  </tr>
  <tr class="bottom-row">
    <td>(0,1)</td>
    <td>(1,1)</td>
  </tr>
</table>
There are many, many, many more tags. This is just a highlight of some of the more useful, common ones.
Comments, Naming, and Tags to Use
Comments
We, as coders, forget what things do. We write things that are really complicated or we know will be difficult to figure out later. Something to keep in mind is that you are mostly writing code for yourself to read later, not for the computer. The hardest part of writing code is having to maintain it later, not writing it the first time. Writing code the first time is the easier part. Going back and trying to remember what the hell you were thinking is the hard part.
This is where comments can be useful. You can leave little notes in your code
that the computer won't read, it'll just ignore them. In HTML, the way you write
a comment is <!-- your comments go here -->. Leave whatever notes you need in
between the <!-- and the --> so that later you can come back to your code
and remember what you were doing. Be careful of going overboard because comments
like <h1>Title of the Article</h1><!-- the title --> aren't useful because
it's pretty obvious that's the title. It's best to have code that describes
itself and doesn't need comments; however, when that falls apart comments can
help.
In most IDEs, a comment can be made with ctrl + /
Meta HTML
Let's go back to our Hello World example and dissect the anatomy of an HTML
file, or document, more closely.
<html>
  <head>
    <!-- *Metadata goes in here -->
    *
    <title>Page Title</title>
  </head>

  <body>
    <!-- *Actual Content Goes in Here -->*
    <p>Hello World!</p>
  </body>
</html>
<!DOCTYPE html>
HTML is an old language. It was invented in 1993! While I'm sure the originators and the early adopters of HTML did their best to make they could, there's no way they could have anticipated that we'd still be using it 25 years and they needs we'd have. As such, HTML has had to evolve in many unexpected ways and part of that is removing bad parts and mistakes that used to HTML as we go along. When they remove bad stuff and add good stuff, they make a new version of HTML. The way we tell the browser that's reading the HTML what version of HTML we're using is this first tag. This particular one is for HTML5, the latest (as of writing) revision of HTML. HTML doesn't get revised very often so this will be the header you'll use for a long time to come.
<html lang="en"></html>
Everything (besides the doctype) goes into your html tag. You'll wrap
everything in here. You also should give it a language attribute to let the
browser know what language your document is in which is what the lang="en" is
communicating. This is useful to the browser to know for a number of reasons.
<head></head>
First, there's <head></head> and also <header></header> and they are
different. Be careful about that. We're talking about <head></head>.
We'll first talk about head. Inside of head goes all of the meta-data to
help the browser understand how to read your document. In our case, the only
thing we're putting in head is the title of the document. What goes inside of
title is what will the name of the tab of the browser. It's also the name of
the Google or Bing search result. Basically, anywhere that's going to display
the title of the web page will use what's inside of here. This is the theme of
what goes in head: data that's useful for reasons other than displaying it. We
can put a tag in here that prevents pinch-to-zoom on mobile if we needed that
(don't do that!) We can put a tag that identifies the description and image that
Google would use for search results. We'll see some more later but for now we'll
stick with just a title.
<body></body>
All of our "visual" HTML will go in here. All your divs, spans, imgs, etc.
Meta tags
Tags like title and meta go into the <head></head> of your HTML document.
These tags are responsible for telling search engines and the browser top-level
information about your site.
<title>⇒ Sets the title of the website- Is what shows up at the top of the tab
<meta>⇒ Sets the metadata of the siteex. description, image preview, social media display, etc
Is used for SEO (Search Engine Optimization)
- i.e. getting your site to show up at the top of Google
A common structure is
<meta name="____", description="____"/><head>
<meta
name="description"
content="Web Development at Berkeley aims to bring web
development education and technologies to the Berkeley
community, centralizing the scattered web education
opportunities and resources offered by current
campus organizations."
/>
</head>Common metadata involves the page title, description, URL, and image preview. The Essential Meta Tags for Social Media | CSS-Tricks
Code Demo
<html>
  <head>
    <title>HTML Reddit</title>
  </head>
  <body>
    <h1>Reddit</h1>
    <div>
      <h2>Post Title</h2>
      <p>Post description</p>
    </div>
    <div>
      <h2>Create a new post</h2>
      <form>
        <p>Enter your post title:</p>
        <input />
        <p>Enter your post:</p>
        <input />
        <input type="submit" />
      </form>
    </div>
  </body>
</html>
Contributors