Django
Introduction
This guide covers the basics of Django, from set up to files like urls.py and views.py. This guide will not cover models.py or databases. That will be a separate guide.
What makes Django so special, anyway?
Django is a framework that gives you lots of scaffolding to build your apps, so you don't need to worry about all the extraneous details of creating and managing new files (like in Node.js, for instance). In other words, you can get straight to programming in an organized fashion because Django creates all the files and consolidates the setup information in them for you.
The Basics: Virtual Environments & Setup
Virtual Environments
A virtual environment is a separate working medium from your local machine. You can have multiple virtual environments, and all of them would be separate from each other. That way, you can have various versions of a language, libraries, and/or modules that are isolated from one another because they reside in their own respective virtual environments. You can think of a virtual environment as a virtual private server.
Why are virtual environments important?
Let's say you're working on two apps without a virtual environment: an open-source project that uses an older version of Django, and your own personal project that utilizes the most recent iteration of Django. You'll notice that you can't contribute to that open-source project because the newest version of Django is not compatible with it.
This is why virtual environments are necessary: if both projects were under their own virtual environments—and therefore had their own versions of Django, separate from your own machine's version—then you are able to work on both without fear of incompatibility.
It's good practice to set up virtual environments so your projects don't affect each other.
Setting up your virtual environment
If you have a 3.5+ version Python interpreter and have not already installed a virtual environment, simply run.
pipx install virtualenv
If you do have virtualenv installed, using it is very simple. Prior to starting your Django app, you should create a virtual environment. In this example, I created a new folder in my Desktop directory where my virtual environment will be established.
mkdir virtual_env_container
cd virtual_env_container
virtualenv newenv
The first two commands should be familiar to you. If they're not, review basic commands in your terminal here.
The last line, however, actually creates our new environment. It's standard to call your virtual environment "newenv." If you have multiple working environments, you can denote them however you please, so long as it's recognizable to you and anyone you may be working with.
Within the virtual environment, there will be several new files and folders.

For the purposes of the setup, we won't be going over what each folder and file is or does.
To activate your virtual environment, simply enter this command:
source bin/activate
Once activated, the virtual environment name you created (in this case, newenv) should appear to the left of your computer's name.
![]()
To deactivate your virtual environment, simply enter "deactivate" in your command line.
Creating your Django project
Once you've activated your virtual environment, you can create your Django project! First, you should install Django within this virtual environment if you haven't already ("pip install django" is what you should enter to install it).
Afterwards, enter this in your virtual environment:
django-admin startproject [enter your project name here]
This will create a new folder with the title of your project name. Inside that folder, you'll see two new items: manage.py, and a folder with the same title name you gave. This is not where you will be building your app!
Change your directory into the folder that has the same title you gave your project. Think of this folder as an admin folder, where you will be connecting to a database or linking up your website to various URLs. In other words, this is where all the connectivity of your back-end happens.
Inside the folder itself should be as follows:
For the purposes of this demonstration, you don't need to worry about any other files except for settings.py and urls.py.
What is settings.py?
settings.py contains all the vital information that allows your app to run, from the apps you utilize within this project to how the back-end connects to a database.
By default, Django makes it so your database engine is SQLite. You can change it as you please, but changing it requires some alterations to the settings. For example, if you wanted to link to Postgres, you would need to input a password, username, and other various items. (We will touch upon this in more depth in lecture.)
You will also find middleware settings and installed_apps. In short, middleware is essentially a plugin system that changes the input and output of Django apps.
The installed apps component is perhaps the most important part of settings, next to databases. Installed apps, as the name implies, are a list of all the applications that are active in this Django project. By default, Django sets up several apps for you, like the admin site you can use to manage content on your site. These apps are not mandatory to keep, but the power of Django lies in the fact that these apps are already set up for you.
You may also add to the installed apps. For example, you might install rest_framework in your Django project. This is where it would go. Your configurations for other apps you create would also be added to this list.
What is urls.py?
Note: This section is referring only to the urls.py in the directory that was created by doing "django-admin startproject [name]". There will be other urls.py in the future.
Recall that urls.py and settings.py are in, what we called, the admin folder. This folder is the heart of our entire application because it allows us to manipulate the settings and integrate our back-end entirely. The integration of the back-end happens in urls.py. This is best explained with an example.
Let's say we have a button that redirects you to a payment page. Let's also assume that once you press this button, a payment will be automatically processed from your credit card.
The page that you are redirected to has a new URL than the previous one you were on. Associated with this new URL are a set of functions in the back-end that processes the payment.
But how would Django know that this URL page should call on the functions to process the payment? This is where urls.py comes in. This is the file where we can input a URL we specify and what functions it should invoke when the URL is entered.
Note: This is a very simplified version of what urls.py is in this particular folder. There are other urls.py that we will discuss in more detail later.
In essence, then, settings.py and urls.py are the core of this admin folder.
Here's an image of what this urls.py in the main directory might look like:
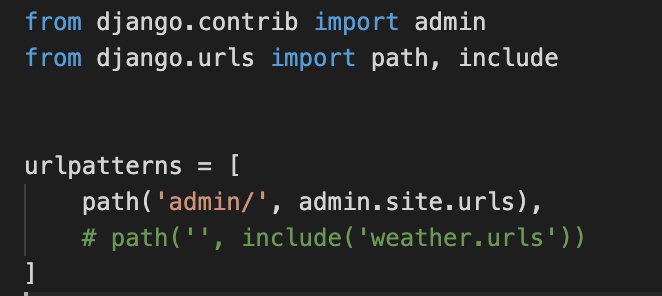
Dissecting this a bit further, the admin import is where all the admin functionality is whenever you go to the path of 'admin/'. For instance, if you were to start the server and went to "127.0.0.1:8000/admin/", you would redirected to the admin site.
The second import is what matters the most. Django.urls houses the functions that allow your server to route to various paths (hence the function "path"). However, when you create your own project, you won't see "include" as part of the import. You can think of "include" as a way to just bring in the routes of the apps you create in your app. In this particular example, I am "including" the urls of my weather app. In other words, I have another app in my Django project called "weather," and in that app it houses a urls.py (different from the one you're looking at right now) where it also includes paths. This will be more clear in the next section.
Lastly, you'll notice the variable called "urlpatterns". This variable must be named "urlpatterns" exactly—it does not follow the typical Python syntax with underscores (i.e., url_patterns). Furthermore, "urlpatterns" must be a list that contains your paths to the various routes in your project.
Understanding "path" is also very important. The first parameter that "path" takes is always going to be your url route. Taking from the payment example earlier, let's say that you have a website called http://cheese.com. Let's say that when you go to cheese.com/payment, it redirects you to a payment page. Payment can be considered its own app within your project (this will make more sense after you read the next section). In other words, the link "cheese.com/payment" will house its own functions in the backend. The path you would then set in urls.py, then, would be:
urlpatterns = [
    path('admin/', admin.site.urls),
    path('payment/', include('payment.urls'))
    # other examples below
    # path('food/', include('food.urls')),
    # path('locations/', include('locations.urls'))
]
Furthermore, the second argument of "path" is the app you are routing to and its own set of urls. "Include" is necessary to do this. "Include" takes the argument of the app's url file. So in this example, this Django project will have an app inside of it titled "payment", which you can think of as a folder for now. This folder houses another urls.py for that particular app. Therefore, we want to "include" that particular urls.py of that app.
Various Apps
Recall that so far, we have a root directory that contains a manage.py file and an admin folder that is the same name as our project. If you wanted to start building your back-end, where would you start if you have no directories to do so? Django has a command that allows you to start:
django-admin startapp [enter the app]
This command will create a new folder that's titled whatever name you give it in the brackets. This new folder will also house very similar files to the main directory folder. This folder is considered to be where your "app" is housed.
It's important to distinguish what an app is with an example. Let's imagine that you're building an Spotify recommendation website that has two features: a recommendation system and a chat feature. These two items are considered to be "apps." Put differently, these two features are not related to each other, and if one were to code them into one giant file, it would become far too messy and unnecessarily complicated. Therefore, it makes more sense to separate the two, creating apps for each of them via startapp.
In concrete terms, you would be entering "django-admin startapp recommendation" and "django-admin startapp chat" in your terminal in the main directory of your Django project. It'll then create two new folders where you can code up the functionality of those apps.
Important: Once you create your app, go back to your settings.py in the main directory and inside "INSTALLED_APP" put in your app name.
INSTALLED_APPS = [
    'django.contrib.admin',
    'django.contrib.auth',
    'django.contrib.contenttypes',
    'django.contrib.sessions',
    'django.contrib.messages',
    'django.contrib.staticfiles',

        # add your app name. For example, if your app is called "recommendation",
        # enter that!
    'recommendation'
]
views.py in your Apps
This is where the functionality of your app is. You can think of this file as where you would house all your functions that allow your back-end to function. For instance, if you need to connect to a REST API, you can do so here.
Here's an example of what a typical views.py file looks like:
from django.shortcuts import render

## Create your views here

def index(request):
    print("hello, world! this will log a print statement in your terminal")
Note that the function "index" will not be in your views.py file. I just did that for an example. Imagine multiple other functions within this file.
urls.py in your Apps
Earlier, I noted that urls.py is in the main directory (in what this guide refers to as the admin folder). There are also other urls.py's! When you create a new app via "startapp" in your terminal, it creates the new folder, but you won't see any urls.py. That's because you're going to have to make it yourself.
Unlike the urls.py in the main directory, this urls.py will be slightly different. You will still be using "path", and you will still be having a variable called "urlpatterns". You will also be putting a route as the first argument of path. However, the second argument will refer to the set of functions that will be invoked if a person were to go to this particular url path you've set.
Here's an pseudocode example:
from django.utils import path
# we will import the functions we want to call from views.
# in this case, we're just importing everything, which is just the function "index"
import * from views

urlpatterns = [
    path('recommendation', views.index)
    # whenever a person goes to the route path with "recommendation", it will call
    # the index function from views
]
Putting everything together through an example
Bob wants to build a Spotify web app where it recommends songs. Here's a brief walkthrough of what how he'll do it (with explanations).
# in the terminal, Bob first creates a directory

mkdir first_project
cd first_project

# he then creates a virtual environment in this folder
virtualenv newenv
cd newenv

# he starts the virtual env
source bin/activate

# once activated, he installs django
pip install django

# after it's installed, we will create the django project, titled "SpotifyProject"
django-admin startproject SpotifyProject

# Bob wants a recommendation component in his project, so he'll make an app for it
django-admin startapp recommendations
# the first thing that Bob does is put his app inside "INSTALLED_APPS"
# in settings.py of SpotifyProject

INSTALLED_APPS = [
    'django.contrib.admin',
    'django.contrib.auth',
    'django.contrib.contenttypes',
    'django.contrib.sessions',
    'django.contrib.messages',
    'django.contrib.staticfiles',
    'recommendations'
]
# Bob goes to urls.py in SpotifyProject and inserts the path

from django.contrib import admin
from django.urls import path, include

urlpatterns = [
    path('admin/', admin.site.urls),
    path('api/', include('recommendations.urls'))
]

# note: the path "api/" is the starter path. This will make sense as we move forward
# Bob then creates creates the function in views.py of recommendations.
from django.shortcuts import render

# Create your views here.

def index(request):
    # enter functionality here
# Once Bob creates the functionality in views.py, he creates urls.py
# in the recommendations folder. Once that folder is created, he adds in
# the path

# inside the urls.py file of recommendations...

from django.urls import path
from . import views

urlpatterns = [
    path('recommendation', views.index)
]
# Once all that is done, he goes to his terminal and enters the following:

python3 manage.py migrate
python3 manage.py makemigrations

# finally, he runs the server
python3 manage.py runserver
Recall that earlier in the urls.py of SpotifyProject, the path was towards "api/". You'll notice that this urls.py path is "recommendation". So how exactly does the urls.py from SpotifyProject connect to this urls.py of recommendations?
Put simply, the path of the urls.py in SpotifyProject is the starter route, and the second route trailing the first is urls.py of recommendations.
So if we wanted to use our functionality of recommendations, we would enter the following url:
127.0.0.1:8000/api/recommendation

# the 127.0.0.1:8000 is your local host
# notice how api is the first route, and then recommendation is the second
# it will not work if you did not include one without the other

# essentially, you'll be redirected to this page and the index function
# of views will be invoked.
Contributors